Last Updated on 6 June 2025 by Daniel Midlands
Table of Contents
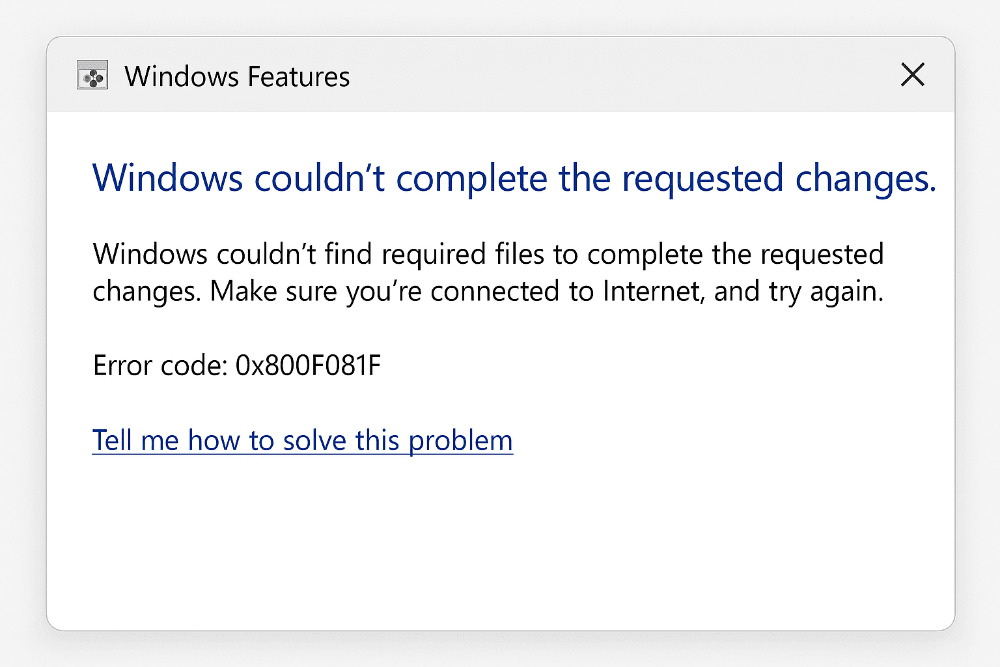
Are you encountering the frustrating Windows Update error 0x800f081f when updating your Windows 11 system?
Don’t worry, you’re not alone.
This error has been troubling Windows users since the release of certain cumulative updates, and I’ve experienced the same challenge myself. The Windows Update error 0x800f081f typically indicates that a required file is missing or corrupted during the update process.
This can happen for various reasons, including corrupted system files, .NET Framework issues, or problems with the Windows Update service itself.
In this guide, I’ll walk you through proven solutions to resolve the 0x800f081f error on Windows 11. These methods have helped countless users update their systems smoothly again, and I’m confident they’ll work for you, too.
We’ll start with the simplest fixes and gradually move to more advanced solutions, ensuring you can tackle this error step by step without feeling overwhelmed.

What is Windows Update Error 0x800f081f?
The Windows Update error 0x800f081f is a system error that prevents your Windows 11 computer from successfully installing updates. This error gained widespread attention when users encountered it while trying to install the Windows 11 KB5016632 cumulative update in August 2022, though it has since appeared with various other updates.
When you encounter this error, Windows essentially tells you it cannot complete the update installation because something fundamental is wrong with the update process itself. The error code 0x800f081f specifically points to issues with the component store or missing files that are essential for the update to proceed. Think of it like trying to build something when you’re missing crucial parts – the process cannot continue until those missing pieces are found or replaced.
This error doesn’t just affect Windows 11 users. It has also been reported on Windows 10 and even Windows Server 2016, making it a fairly widespread issue across Microsoft’s operating systems. The error typically manifests during the download or installation phase of Windows Updates, often causing the update process to fail completely and sometimes leaving your system in an inconsistent state.
The error is closely related to the .NET Framework, particularly version 3.5, a critical component that many Windows updates depend on. When the .NET Framework becomes corrupted or is missing essential files, it can trigger the 0x800f081f error during update installations. This connection to .NET Framework is why many solutions we’ll explore focus on repairing or reinstalling this component.
How to Fix Windows Update Error 0x800f081f in Windows 11
Now that we understand what causes the 0x800f081f error, let’s walk through the solutions step by step. I recommend trying these methods in the order presented, starting with the simplest fixes and progressing to more advanced solutions only if needed.
Method 1: Enable .NET Framework 3.5
Since the 0x800f081f error is often related to .NET Framework 3.5 issues, the first solution is to ensure this component is properly installed and enabled on your system. Even if you think it’s already installed, disabling and re-enabling it can help resolve corruption issues.
Here’s how to enable or reinstall .NET Framework 3.5:
- Press the Windows key + S to open the search function
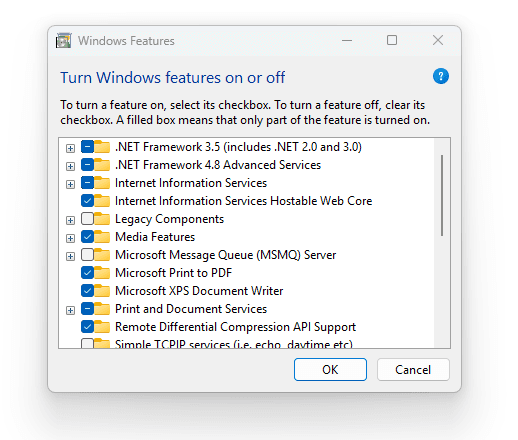
- Type “Windows Features” and click on “Turn Windows features on or off” in the search results
- In the Windows Features dialogue box, look for “.NET Framework 3.5 (includes .NET 2.0 and 3.0)”
- If the checkbox is empty, click to select it
- If the checkbox is already selected, uncheck it first, click OK, then reopen Windows Features and check it again
- Click OK to apply the changes
- When prompted, select “Let Windows Update download the files for you”
- Wait for the installation to complete, then restart your computer
This process reinstalls or repairs the .NET Framework 3.5 components, often resolving the 0x800f081f error. Many Windows updates depend on these components, and when they’re corrupted or missing, the update process fails. By reinstalling them, you’re providing Windows with the building blocks to install updates successfully.
Method 2: Run Windows Update Troubleshooter
Windows includes a built-in troubleshooter designed to detect and fix common update problems. This tool can automatically identify and resolve many issues that cause the 0x800f081f error.
Follow these steps to run the Windows Update troubleshooter:
- Right-click on the Windows Start button and select Settings
- In the Settings window, click on System in the left sidebar
- Scroll down and click on Troubleshoot
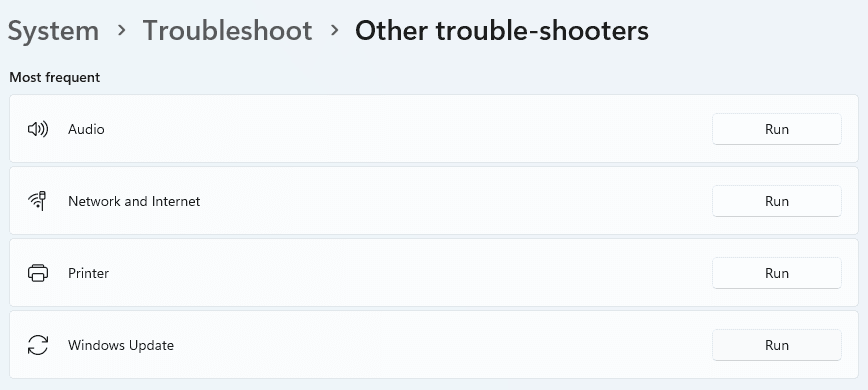
- Click on Other troubleshooters
- Find Windows Update in the list and click the Run button next to it
- Follow the on-screen instructions and allow the troubleshooter to detect and fix problems
- Once the process completes, restart your computer
- Try running Windows Update again to see if the error is resolved
The troubleshooter effectively resolves temporary glitches and minor corruptions in the Windows Update system. While it may not fix more serious underlying issues, it’s always worth trying because of its simplicity and the fact that it often resolves problems without requiring further intervention.
Method 3: Reset Windows Update Services
The Windows Update and related services sometimes get stuck or corrupted, leading to errors like 0x800f081f. Resetting these services can often resolve the issue by giving them a fresh start.
Here’s how to reset Windows Update services:
- Press Windows key + S and search for “Services”
- Click on the Services app in the search results
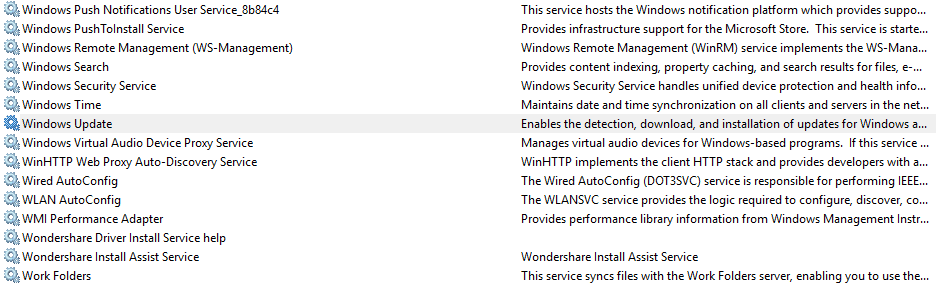
- In the Services window, scroll down to find Windows Update
- Right-click on Windows Update and select Properties
- In the Startup type dropdown menu, select Disabled
- Click Apply and then OK
- Restart your computer
- After restarting, open Services again
- Find Windows Update, right-click and select Properties
- Change the Startup type to Automatic
- Click Apply and then OK
- Restart your computer again
- Try running Windows Update to see if the error is resolved
This process effectively resets the Windows Update service by stopping it, preventing it from starting automatically, and then re-enabling it after a system restart. This clears any stuck processes or corrupted states that might be causing the 0x800f081f error.
Method 4: Run DISM and SFC Commands
System file corruption is a common cause of the 0x800f081f error. Windows provides two powerful command-line tools to repair system files: DISM (Deployment Image Servicing and Management) and SFC (System File Checker). These tools can often resolve update errors by repairing the underlying system files.
Follow these steps to run DISM and SFC:
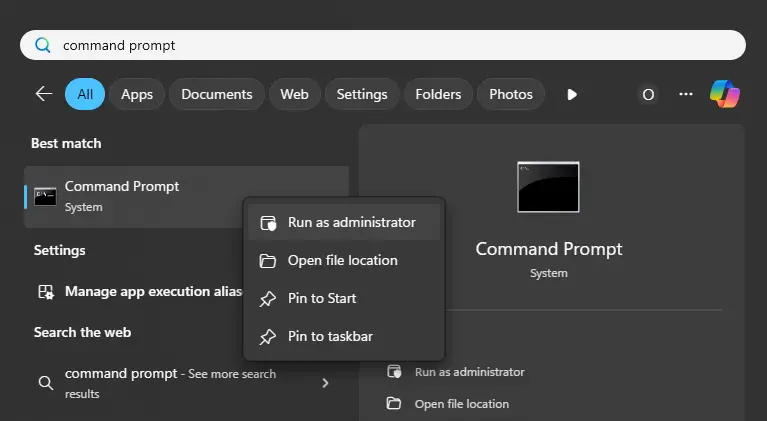
- Press Windows key + S and search for “Command Prompt”
- Right-click on Command Prompt and select Run as administrator
- In the Command Prompt window, type the following command and press Enter:
DISM /Online /Cleanup-Image /CheckHealth
4. After that completes, run the following command:
DISM /Online /Cleanup-Image /ScanHealth
5. Next, run this command to restore the health of your system image:
DISM /Online /Cleanup-Image /RestoreHealth
6. Once DISM completes (this may take several minutes), run the System File Checker with this command:
sfc /scannow
7. Wait for the SFC scan to complete (this can take some time)
8. Restart your computer
9. Try running Windows Update again
The DISM tool repairs the Windows component store, often the source of the 0x800f081f error. It compares your system’s files to Microsoft’s online repository of Windows files and replaces any corrupted components. The SFC tool then checks all protected system files and replaces any corrupted files with correct versions from a cached copy on your computer.
It’s important to run these commands in the order listed, as DISM repairs the underlying component store on which SFC relies. Running DISM first ensures that SFC can access uncorrupted system file copies when it repairs.
Method 5: Edit Group Policy Settings
Group Policy settings can sometimes interfere with Windows Update operations, particularly settings related to optional component installation. Modifying these settings can resolve the 0x800f081f error by allowing Windows to access the files it needs for updates properly.
Here’s how to edit the relevant Group Policy settings:
- Press Windows key + R to open the Run dialogue
- Type gpedit.msc and press Enter (Note: This feature is not available in Windows 11 Home edition by default)
- In the Local Group Policy Editor, navigate to: Computer Configuration > Administrative Templates > System
- In the right pane, look for “Specify settings for optional component installation and component repair”
- Double-click on this setting to open it
- Select the Enabled radio button
- Click Apply and then OK
- Close the Group Policy Editor
- Restart your computer
- Try running Windows Update again
If you’re using Windows 11 Home, which doesn’t include the Group Policy Editor by default, you can achieve a similar result by modifying the registry directly. However, this requires more caution as incorrect registry modifications can cause system problems.
Method 6: Clear Windows Update Cache
The Windows Update cache can become corrupted over time, leading to errors like 0x800f081f. Clearing this cache forces Windows to download fresh update files and can resolve issues caused by corrupted cached data.
Follow these steps to clear the Windows Update cache:
- Press Windows key + S and search for “Command Prompt”
- Right-click on Command Prompt and select Run as administrator
- In the Command Prompt, type the following commands one by one, pressing Enter after each:
net stop wuauserv
net stop bits
- These commands stop the Windows Update and Background Intelligent Transfer services
- Open File Explorer and navigate to C:\Windows\SoftwareDistribution\Download
- Select all files in this folder (Ctrl+A) and delete them
- Return to the Command Prompt and restart the services with these commands:
net start wuauserv
net start bits
- Close the Command Prompt and restart your computer
- Try running Windows Update again
Clearing the Windows Update cache removes all temporarily downloaded update files and forces Windows to start fresh with the download process. This can resolve issues caused by corrupted downloads or incomplete update files that might trigger the 0x800f081f error.
Method 7: Remove Registry Entries
Specific registry entries can interfere with Windows Update operations and cause the 0x800f081f error. Specifically, the WUServer and WIStatusServer entries in the Windows Update policy registry can sometimes contain incorrect values that prevent updates from installing correctly.
Important Warning: Modifying the registry can cause serious system problems if done incorrectly. Always create a backup of your registry before making any changes.
Here’s how to safely remove these registry entries:
- Press Windows key + R and type regedit, then press Enter
- In the Registry Editor, navigate to: HKEY_LOCAL_MACHINE\SOFTWARE\Policies\Microsoft\Windows\WindowsUpdate
- Look for entries named WUServer and WIStatusServer
- If these entries exist, right-click on each one and select Delete
- Confirm the deletion when prompted
- Close the Registry Editor
- Restart your computer
- Try running Windows Update again
Before making these changes, it’s wise to create a registry backup by going to File > Export in the Registry Editor and saving a copy of the registry. This allows you to restore the original settings if something goes wrong.
Method 8: Manually Download and Install Updates
If Windows Update continues to fail with the 0x800f081f error, you can bypass the automatic update mechanism by manually downloading and installing the problematic update from Microsoft’s Update Catalogue.
Here’s how to manually download and install updates:
- Open your web browser and go to the Microsoft Update Catalogue website
- In the search box, enter the KB number of the update that’s failing to install
- From the search results, find the update that matches your system architecture (x64 for 64-bit systems, x86 for 32-bit systems)
- Click the Download button next to the appropriate update
- A new window will open with a download link – click on the link to download the update file
- Once downloaded, navigate to the download location and double-click the update file to run it
- Follow the installation wizard prompts to install the update
- Restart your computer when prompted
Manual installation bypasses the Windows Update service entirely, which can be helpful when the service itself is causing the 0x800f081f error. This method is handy for installing critical security updates that you need to install immediately while you work on resolving the underlying Windows Update issues.
When manually downloading updates, select the correct version for your system. You can check your system type by going to Settings > System > About and looking at the “System type” entry.
Method 9: Reset Windows 11 (Last Resort)
If none of the previous methods resolve the 0x800f081f error, resetting Windows 11 can provide a fresh start while preserving your personal files. This more drastic solution should only be used when other methods have failed.
Here’s how to reset Windows 11 while keeping your files:
- Press Windows key + I to open Settings
- Click on System in the left sidebar
- Scroll down and click on Recovery
- Under “Recovery options,” click Reset PC next to “Reset this PC”
- Choose Keep my files when prompted
- Select Cloud download to get the latest version of Windows 11
- Review the settings and click Reset to begin the process
- Follow the on-screen instructions and wait for the reset to complete
The reset process reinstalls Windows 11 while preserving your personal files, but it removes installed applications and resets system settings to their defaults. This effectively resolves any system-level corruption that might be causing the 0x800f081f error.

When to Contact Microsoft Support
While the methods outlined above resolve the 0x800f081f error for most users, there are situations where professional support might be necessary. Knowing when to seek help can save time and prevent potential system damage from attempting overly complex solutions.
If the error persists after you’ve tried all the methods above, consider contacting Microsoft Support. This is particularly important if you’re dealing with a business-critical system or are uncomfortable performing some of the more advanced troubleshooting steps. Microsoft’s support team has access to specialised diagnostic tools and can provide solutions tailored to your specific system configuration.
Dealing with Windows Update error 0x800f081f on Windows 11 can be frustrating, but as we’ve seen throughout this guide, multiple proven solutions can get your system updating smoothly again.
The key is understanding that this error typically indicates missing or corrupted files during the update process and systematically addressing the underlying causes.
The most effective approach is to start with simpler solutions and work through the more advanced methods if needed. Many users succeed with the first few methods – enabling .NET Framework 3.5, running the Windows Update troubleshooter, or resetting Windows Update services. These solutions address the most common causes of the 0x800f081f error without requiring extensive technical knowledge.
I hope this comprehensive guide has helped you understand and resolve the Windows Update error 0x800f081f on your Windows 11 system. These solutions have worked for many users facing the same challenge, and with patience and systematic troubleshooting, you should be able to get your updates working correctly again.
Remember, every Windows user has faced update errors at some point – you’re not alone in this experience, and with the right approach, these issues can be resolved successfully.
Related guide: If you’re facing a different issue, such as broadband connection problems and seeing Error 813, here’s how to fix it in Windows 11.
Comments are closed